How to solder or weld aluminum pipe
Introduction of welding aluminum pipe
Welding aluminum tubing is crucial in many applications, including automotive repairs, bicycle manufacturing, and home repairs. Although welding aluminum is more challenging than welding steel, mastering this skill is highly beneficial for DIY enthusiasts. This article aims to provide a comprehensive guide to help beginners learn how to weld aluminum tubing.
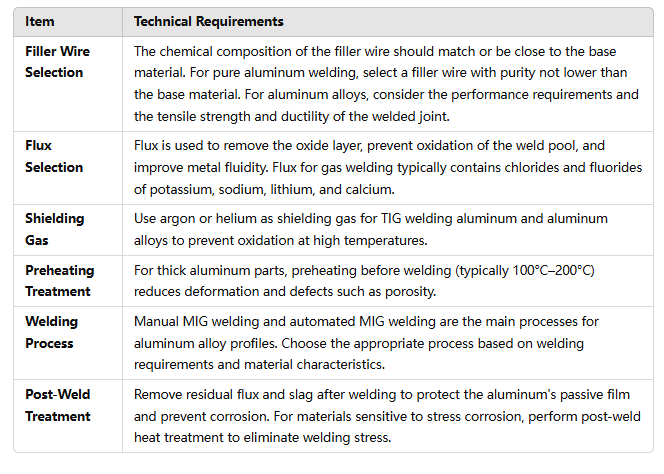
Key Technical Points for Welding Aluminum Alloys:

Notes:
Filler Wire Selection: Matching filler and base material compositions ensures joint strength and corrosion resistance.
Flux Selection: Active components in the flux enhance welding quality, especially in gas welding.
Shielding Gas: Argon is the most commonly used gas, with a purity of 99.99% or higher. Helium can be mixed for higher heat input requirements.
Preheating Treatment: Particularly beneficial for thick aluminum parts or operations in low-temperature environments.
Welding Process: MIG welding is widely used for efficient joining, especially in mass production of aluminum alloy structures.
Post-Weld Treatment: Proper cleaning ensures long-term performance and appearance

Welding Steps
Setting the Welding Parameters
Set the welding machine parameters according to the thickness of the aluminum tubing and the welding method:
Current and voltage: Typically, aluminum welding requires higher current. Adjust the specific values based on the welding machine and tubing thickness.
Gas flow rate: Argon is commonly used as the shielding gas, with a flow rate set to 15-20 CFH (cubic feet per hour).
Starting the Welding Process
Ignite and maintain the arc: Start the welding machine and ignite the arc. Keep the arc stable and at an appropriate length.
Control welding speed and heat input: Slowly move the welding torch, maintaining an even welding speed to avoid overheating and deformation of the aluminum tubing.
Keep the weld smooth and consistent: Adjust the welding speed and filler material to ensure the weld is smooth and consistent.
Inspection and Adjustment
Regularly check the weld quality during the welding process. If any issues, such as uneven welds or cracks, are found, make timely adjustments and corrections.
Post-Welding Treatment
Inspecting the Weld
After welding, inspect the weld:
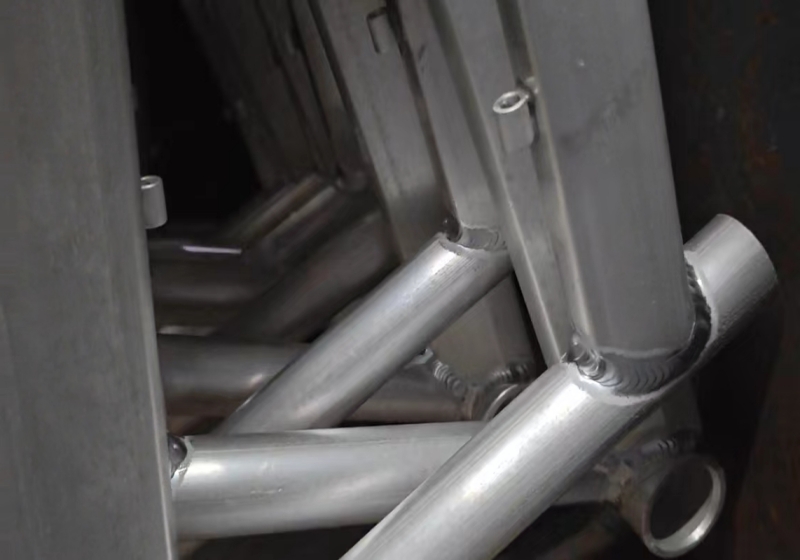
Visual inspection: Check if the weld appearance is smooth, without cracks or pores.
Non-destructive testing methods: If necessary, use methods like ultrasonic testing to ensure the weld quality.
Grinding and Cleaning the Weld
Use sandpaper or a grinding tool to smooth the weld, removing excess weld material and surface oxides. Ensure the weld is smooth and meets aesthetic and functional requirements.
Common Issues and Solutions for aluminum welding beginners
Porosity Issues
Cause: Insufficient shielding gas or inadequate surface cleaning.
Solution: Increase gas flow, ensure proper gas coverage, and thoroughly clean the welding area.
Cracking Issues
Cause: Rapid cooling in the heat-affected zone or stress concentration.
Solution: Preheat the workpiece before welding and adjust the welding sequence to reduce stress concentration.
Insufficient Penetration
Cause: Low welding current or overly fast torch movement.
Solution: Increase the current appropriately, slow down the welding speed, and ensure full pool formation.
Practice Suggestions for aluminum welding beginners
Practice Welding Speed: Simulate straight-line welds on scrap aluminum plates to master pool control.
Observe the Weld Pool: Pay attention to the shape and color changes of the pool to avoid burn-through or uneven cooling.
Record Parameters: Record changes in current, voltage, and gas flow during each adjustment to build experience.
